 Home
 HTML/CSS
 Link 1
 Sublinks >>>
 jQuery/JS
 PHP
 MySQL
 XSLT

How To Mass Delete Comments In WordPress – Spam, Pending & Approved
With WordPress Comment Spam increasingly becoming an issue
you might find yourself with 100’s or even 1000’s of pending comments that you
then need to delete. Unfortunately, the base WordPress install only lets you “bulk
delete” pending comments page by page (i.e. 20 at a time). It is not
difficult to imagine that this would be very time consuming to do.

Let us first read some basic facts about WordPress comments.
When comments come in for your WordPress blog, they can be
one of these three categories.
1. Approved Comments:– WordPress has detected that these
comments are real comments, and has immediately approved these comments.
2. Pending Comments:– These comments pass the spam filter,
but either WordPress feels they they are some sorta “non human”, or it violates
some of the rules you have laid in the blog discussion settings.
3. Spam Comments:– If you have the very handy Akismet in
place, commented identified as spam will go direct to spam comments.
However, the issue comes when hundreds, or thousands of
comments come in and they go into your moderation queue. This means they pass
the spam filter.
If your blog is popular to any extent, you can expect to
receive a lot of spam comments. These are easy to clear. All you have to do is
to click on Comments > Spamfrom your WordPress admin page, and you can
clear them in one go, with the “Delete all Spam” button.
Before (or after) deleting the pending comments you may want to consider configuring your WordPress install to help prevent spam comments.
Fortunately, there is an easy way to Delete Pending Comments
in WordPress. In fact you have a few choices on how you go about doing it.


Deleting Pending Comments In WordPress Manually via phpMyAdmin
You can delete easily your WordPress Mass pending comments uing phpMyAdmin. To do so,
you need to follow the below steps.
1. Login to your cPanel Account and select the phpMyAdmin
in the Database section.
2. Select your database.
3. Click the SQL tab and run the following command.
DELETE from wp_comments WHERE comment_approved = ‘0’
When you run the command, you will get a pop-up box asking
for confirmation. Just click “OK”.
You can use this technique to carry out other similar tasks
with just one very minor alteration to the command used.
Mass Delete All Approved Comments In WordPress via SQL
DELETE from wp_comments WHERE comment_approved = ‘1’
Mass Delete All Spam Comments In WordPress via SQL
DELETE from wp_comments WHERE comment_approved = ‘spam’
Mass Delete All Trash Comments In WordPress via SQL
DELETE from wp_comments WHERE comment_approved = ‘trash’
Deleting Pending Comments In WordPress Manually via SSH
For those a little more technically minded and don’t mind
logging in via SSH and
using the command line it is very easy to Delete all your Pending
Comments. Just follow these instructions.
1. Log in to your website server via SSH. Some hosts will
disable this by default, but will allow access upon request.
2. Run the following command.mysql -uDB_USERNAME -pDB_USER_PASSWORD -DYOUR_WORDPRESS_DB_NAME -e “DELETE FROM wp_comments WHERE comment_approved = ‘0’;”
If you used Softaculous, or another installer, to install
WordPress, you would have received a confirmation after the install was
complete with all the information you will need to run this command.
Otherwise, you will hopefully have made a record of it when you installed it
manually.
This command can be adapted with one minor change to carry
out other comment related tasks.
Mass Delete all Approved Comments In WordPress via SSH
mysql -uDB_USERNAME -pDB_USER_PASSWORD -DYOUR_WORDPRESS_DB_NAME -e “DELETE FROM wp_comments WHERE comment_approved = ‘1’;”
Mass Delete All Spam Comments In WordPress via SSH
mysql -uDB_USERNAME -pDB_USER_PASSWORD -DYOUR_WORDPRESS_DB_NAME -e “DELETE FROM wp_comments WHERE comment_approved = ‘spam’;”
Mass Delete All Trash Comments In WordPress via SSH
mysql -uDB_USERNAME -pDB_USER_PASSWORD -DYOUR_WORDPRESS_DB_NAME -e “DELETE FROM wp_comments WHERE comment_approved = ‘trash’;”
Deleting Pending Comments In WordPress Using A Plugin
This is probably the least technical way to delete your
pending comments in WordPress, and one of the easiest. Simply install the Delete Pending
Comments Plugin. The easiest way to install the plugin is to go to
the Plugins page in the Admin panel and then search for “Delete Pending
Comments”. The plugin we recommend is the first one listed, although you
will see several others that could be used.
Once installed, activate the plugin.
Under the Comments Menu in WordPress, you will see a
sub-menu item to “Delete Pending Comments.” Once clicked you will be
taken to the confirmation screen checking that you do indeed wish to delete all
your pending comments. To confirm you will need to type some text in the
box to confirm.
If successful, you will get a message saying “I deleted all
pending comments!”.
I hope this article helped you a lot on deleting mass comments in WordPrss. As always feel free to comment in case you need help or have
a question. Also share it to your friends.
How To Password Protect Your WordPress Admin Directory (WP-Admin)
As you read the title, you are probably wondering isn’t the
wp-admin directory already password protected. You are required to login right.
Well that is true, but to add an additional layer of security popular sites
often add an extra layer of authentication.
In this article, we will show you a step by step
guide on how to password protect your WordPress admin (wp-admin) directory.

Why A Second Username And Password?
For me, personally, I have a WordPress security plugin that
notifies me, by email, every time some jerk tries to log in to my WordPress
wp-admin. The most frequently entered username guess these hackers try
include!
--- admin. Most common guess. Lesson here: when you install
WordPress DO NOT USE the default-admin for a username and choose a
strong Strong Password.
--- wp-admin.
--- no_matches.
I was shocked to learn that hackers try to access my
wp-admin page between 6-15 times a day! I guarantee all WordPress sites
experience the same thing. I got tired of getting these emails from my
WordPress security plugin so I decided to add an extra username and password so
the idiots can’t even get to the default wp-admin username and password form in
the first place.
The WordPress wp-admin Folder Already Has A Username And Password
By adding a second layer of authentication security it would
take one seriously skilled hacker to be able to get in.
Password Protect WP-ADMIN With Your Hosting Control Panel
This is probably the easiest way as you don’t have to mess
with .htaccess and .htpasswd files. Here I will provide examples for Hostgator hosting.
To keep things easy and simple, we will only cover cPanel web hosting companies here just because cPanel has an easy enough interface to add password protected directories.

To keep things easy and simple, we will only cover cPanel web hosting companies here just because cPanel has an easy enough interface to add password protected directories.
When you click on that, a lightbox popup will show up asking
for directory location. Just click on web root. Once you are there, navigate to
the folder where your WordPress is hosted. Then click on the /wp-admin/ folder.
You will see a screen like this.


Simply check the box to password protect the directory. Then
create a user for the directory. That is it. Now when you try to access your
wp-admin directory, you should see an authentication required box like this.
Manual Method
First create a .htpasswds file. You can do so easily by
using This Generator. Upload this file
outside your /public_html/ directory. A good path would be:
home/user/.htpasswds/public_html/wp-admin/passwd/
Then, create a .htaccess file and upload it in /wp-admin/
directory. Then add the following codes in there.
AuthName "Admins Only"
AuthUserFile /home/yourdirectory/.htpasswds/public_html/wp-admin/passwd
AuthGroupFile /dev/null
AuthType basic
require user putyourusernamehere
You must update your username in there. Also don’t forget to
update the AuthUserFile location path.
I Have A 404 Error Or A Too Many Redirects Error
Well this can happen depending on how your server is
configured. To fix this issue, open your main WordPress .htaccess file and add
the following code there before the WordPress rules start.
ErrorDocument 401 default
Well there you have it. Now you have double authentication
for your WordPress admin area. This is a good alternative to Limitingwp-admin Access By IP Address.
Update:- Here Is How To Fix The Admin Ajax Issue
If you password protect your WordPress Admin directory, then
it will break the Ajax
functionality in the front-end (if it is being used). In our case, we don’t
have any plugins that is using ajax
in the front-end. But if you do, then here is how you fix that issue.
Open the .htaccess file located in your /wp-admin/ folder
(This is NOT the main .htaccess file that we edited above).
In the wp-admin .htaccess file, paste the following code:
<Files admin-ajax.php>
               Order allow,deny
               Allow from all
               Satisfy any
</Files>
Follow this article, if you still get any error, please notify me in comments, I will try to solve those errors elegantly.
How To Control WordPress User Permissions Effectively Using The User Role Editor?
The WordPress user system controls what users can and cannot
do on your website. This includes administrative tasks, writing content,
approving content, plugin and theme management, and more.
Out of the box, there are Five User Roles available with
WordPress. I am sure you are all aware of these roles; however let us review
them quickly before moving on.

The five default user roles are!
1. Administrator
Has access to all administrative
options and features.
2. Editor
Can manage and publish posts. Traditionally,
editors review posts submitted by contributors and then schedule them for
review.
3. Author
Can publish their own posts when they wish.
4. Contributor
Can write posts but cannot publish them.
Instead, they need to submit their posts for review.
5. Subscriber
Has basic functionality such as changing
their profile and leaving comments.
Contributors are not permitted to upload files either.
Therefore, they cannot upload images to their articles. Due to this, I always
manually change the permissions of the contributor user role so that they can
upload images. The plugin I use to do that is User
Role Editor.
Once you have loaded a user role profile, you will see a
list of what a user assigned to that user role can and cannot do. To change
permissions for a user role, check or un-check the field for that capability.
All capabilities can be enabled or disabled using the “Select All” and
“Un-select All” buttons at the right hand side of the page.
Unfortunately, the default version of WordPress does not
allow you to change what particular user roles can and cannot do. Nor does it
allow you to create your own custom user groups.
This can be restrictive when running a multi author website.
Take the contributor user role, for example. The contributor user role allows
users to delete posts. This is not always ideal as a situation could arise
where a writer deletes their article after being paid for it (rare, but still
possible).
User Role Editor
User Role Editor can be installed directly through your
WordPress admin area. Alternatively, you can Download The Plugin From Official WordPress Plugin Directory and then upload the
files manually using file transfer protocol.
You will find User Role Editor under the Users menu once you
have activated the plugin.
The plugin is straight forward to use. The user role can be
selected at the top of the page. This list includes all default user roles and
any custom user roles you have created.
 |
All core WordPress capabilities are displayed for each user
role.
|
User Role Editor does not only support core capabilities.
The plugin also lists capabilities for any additional functions you have
defined through your theme or through plugins.
 |
Custom capabilities are listed in the bottom half of the
User Role Editor.
|
New roles and capabilities can be added and deleted through
the main User Role Editor page too. If you are basing a new user role on an
existing user role (e.g. author), you can choose to copy permissions from that
role. This saves you from having to enable all capabilities again.
 |
New user roles can easily be created through the plugin.
|
Capabilities can also be defined on a user level. You will
see a link to the user capabilities page in the WordPress user list page.
For example, say you have a group of ten authors writing for
your blog. Each author sticks to the publishing schedule that you have
developed for your writing team, except one. That particular author does not
understand WordPress correctly and frequently publishes articles on the wrong
day or time. Rather than remove them from the author role or create a
completely new user role for them, you can simply remove the permission that
allows them to publish posts.

 |
The capabilities of every user can be modified.
|
Controlling user permissions on a user level is useful when
you want to change the capabilities of a specific user.
A basic settings page can be found within the settings area
for User Role Editor. Settings include displaying the administrator user role
within User Role Editor, showing capabilities in a more readable form and
showing capabilities that have since been deprecated (i.e. capabilities that
have been superseded by more relevant capabilities).
 |
A few basic configuration options are available.
|
The default roles settings page lets you define what user
role users are assigned when they sign up to your website. This can be useful
if you are using a forum plugin such as bbPress, but be careful about changing
the default user role from subscriber on normal blogs and websites, as you will
give permissions to anyone who signs up. On most setups, it is safer to
manually upgrade users to the desired user role instead.
 |
The default role that new users are assigned can also be
defined.
|
If you have ever felt restricted by the default capabilities
of WordPress user roles, I encourage you to give User
Role Editor a try. It gives you complete control of the WordPress user
system and will help you manage your users in whatever way you see fit. Make sure to comment your suggestions in comments if you have any.
How To Change User Roles In WordPress – User Roles & Capabilities
Since the release of version 2.0, User Roles have been an
important and integral part of WordPress. Giving you the ability to control who
can do what with your site, the WordPress user management system not only helps
you manage your site efficiently and effectively but also minimizes the chances
of any mistakes or accidents happening that could bring disastrous consequences
to your site.
As a WordPress site owner, you must be familiar with User
Roles and their Capabilities especially if you run a large online publication
or collaborate with a group of users contributing to your site in one way or
another. This is very crucial to strike a perfect balance between permissions
and restrictions for each WordPress user. After reading this easy-to-follow
guide, you’ll have a solid understanding of how to manage WordPress User Roles
properly.
So, let’s start!

Understanding User Roles In WordPress
A Role in WordPress basically defines a set of tasks, called
Capabilities, which a person is allowed to perform. Each Role is assigned
a default set of capabilities that determine what that role can or can’t do;
however, you can assign or remove other capabilities using WordPress functions.
Without capabilities, a Role is nothing but just a name without any control. In
short, a role is an entity made up of a unique name and a set of capabilities
that define what features of WordPress the role is allowed to access and use.
Out of the box, WordPress ships with following default user
roles.
1. Super Administrator
The super admin user role is a multi-site-network-only role.
As the name itself describes, this user role has the maximum capability and
therefore, can access all the site network administration features. Users with
this most powerful role not only can access and manage multiple sites but also
can add and delete sites from a multi-site network.
2. Administrator
Administrator is the most powerful user role in a regular
WordPress installation. It is by default the first user on a WordPress site,
who can do everything from updating core to deleting users. Users with this
role have full access and control over all the administrative features within a
single site.
3. Editor
Users with the editor role have complete control over the
content, including all media files, of a WordPress site. They can publish and
manage all posts including those created by other users or labeled private.
They can also manage comments, categories, links, tags and pages, but can’t
make any changes to the settings of a WordPress site.
4. Author
A step down from the editor, an Author is able to publish
and manage their own posts but doesn’t have access to content created by other
users. While publishing, authors can add tags and media files to their posts.
However, they are not allowed to create, edit or delete categories and pages.
5. Contributor
A contributor is someone who can write, edit and delete
their own posts but is unable to publish them. Unlike Authors, contributors
don’t have the ability to upload files to the Media Library. However, they can
add tags to their posts. In general, this user role is reserved for guest
authors whose content needs to be reviewed by an Admin or Editor before
publishing.
6. Subscriber
A subscriber has the lowest access to WordPress’ features. Users with the subscriber role can only read your site, leave comments and create and manage their user profile. Besides, they can’t do anything else inside Dashboard. It’s important to note that WordPress by default labels all new users as Subscribers.Understanding Capabilities In WordPress
This is the real beauty of how the system works.
Capabilities are permissions. They’re a way of saying a role can or can’t do
something.
Capabilities are given to roles. So, users of a certain role
are limited by that role’s capabilities.
For Example:-
The administrator role (by default) is granted the capability of { edit_themes }. You don’t get to edit your theme because you’re an administrator. You are allowed to edit your theme because your role (administrator) has the capability of { edit_themes }. If you took away that capability, you would no longer be able to edit your theme in the WordPress admin, no matter how important you think your role is.
The administrator role (by default) is granted the capability of { edit_themes }. You don’t get to edit your theme because you’re an administrator. You are allowed to edit your theme because your role (administrator) has the capability of { edit_themes }. If you took away that capability, you would no longer be able to edit your theme in the WordPress admin, no matter how important you think your role is.
Basic WordPress Functions To Manage Roles And Capabilities
Now that you have understood User Roles and their
Capabilities in WordPress, let’s move to basic WordPress functions that are
used to create and manage roles and capabilities. These are five simple
functions.
{ add_role(): } - Enables you to add a new custom role to
WordPress.
{ remove_role(): } - Allows you to remove a custom role from
WordPress.
{ add_cap(): } - Lets you add a custom capability to a role
or specific user.
{ remove_cap(): } - Allows you to remove a custom capability
from a role or specific user.
{ get_role(): } - Enables you to fetch a role definition.
Let’s see these functions in action through the following
examples.
1. Creating Your Own Custom User Roles
In addition to five default user roles, WordPress allows you
to add (and remove) custom roles to the system. To add a new custom role, all
you need to use the { add_role() } function, which takes three parameters
– { $role } (role name), { $display_name } (display name for role) and { $capabilities } (list
of capabilities).
<?php
$result = add_role(
'comment_moderator',
__('Commment Moderator', 'testdomain' ),
array(
'read' => true,
'moderate_comments' => true,
‘edit_comment’ => true,
'edit_themes' => false,
'install_plugins' => false,
'update_plugin' => false,
'update_core' => false
)
);
? >
The above code snippet, which you can use within a plug-in
or your active theme’s { functions.php } file, adds a new role called
‘Comment Moderator’ with three capabilities read, ‘{ moderate_comments }‘ and ‘{ edit_comment }’,
and four restrictions ‘{ edit_themes }‘, ‘{ install_plugins }‘, ‘{ update_plugin }‘ and ‘{ update_core }‘.
<?php
remove_role( 'comment_moderator' );
?>
2. Adding / Removing Custom Capabilities From A User Role
Despite each user role in WordPress comes with a pre-defined
set of capabilities, you can add or remove other capabilities from a role or
specific user by making use of { add_cap() } and { remove_cap() } functions.
<?php
function add_capability() {
$role = get_role( 'author' );
$role->add_cap( 'edit_others_posts' );
$role->remove_cap( ‘upload_files’ );
}
add_action( 'admin_init', 'add_capability');
?>
3. Changing A Specific User’s Capabilities
If you want to change the capabilities of a specific user,
you can do so by using following code.
<?php
function wp_specific_user() {
$user_id = 5;
$user = new WP_User( $user_id );
$user->add_cap( 'delete_posts' );
$user->remove_cap( 'edit_posts' );
}
add_action( 'admin_init', 'wp_specific_user');
?>
4. Checking A User’s Capabilities
To check if a particular user has capability or role, use the { user_can() } function that takes user ID as its first parameter.<?php
if ( user_can( 5, 'moderate_comments' ) ) {
echo 'The current user is able to moderate comments';
}
?>
To get the ID of a particular user, consider using a plug-in
like Reveal IDs.
5. Changing The Name Of An Existing User Role
In WordPress, you’re not allowed to change the name of a
user role but using the following code, you can change a default role name to
what you actually want.
function change_default_role_name () {
global $wp_roles;
if ( ! isset( $wp_roles ) )
$wp_roles = new WP_Roles();
$wp_roles->roles['editor']['name'] = 'Owner';
$wp_roles->role_names['editor'] = 'Owner';
}
add_action('init', 'change_default_role_name');
Plug-Ins To Manage User Roles And Capabilities
If you’re not a developer-type, don’t panic! There are several WordPress plug-ins that allow you to easily manage user roles and capabilities without writing a single line of code. The most popular ones are listed below.1. User Role Editor
User Role Editor is an easy to use WordPress plug-in using
which you can quickly add, edit or delete user roles and capabilities with a
few clicks of mouse. All you need to do is to select a role, turn on check
boxes of capabilities that you want to add and click the update button.
However, you can’t make any changes to Administrator user role.

2. Capability Manager Enhanced
The Capability Manager Enhanced provides you the simplest way to manage user
roles and capabilities in WordPress. With Capability Manager Enhanced, not only
you can add new roles but also can add or remove capabilities from any role.
Best of all, this amazing plug-in fully supports role networking and capability
negation.

3. Members
Members is a powerful WordPress plug-in built to let you
manage users, roles, and capabilities without any hassle. It comes with a
user-friendly interface to give you complete control over WordPress roles and
permissions. What’s more interesting is that you can control who will have
access to the content of your site or even can make the site completely private.

4. WPFront User Role Editor
The WPFront User Role Editor enables you to manage user roles in WordPress.
Not only you can create, edit or delete user roles and capabilities but also
can change default user role and clone existing roles. A pro version with
additional features is also available for advanced users.

5. User Roles And Capabilities
User Roles and Capabilities is another simple plug-in that
allows you to manage roles and permission in WordPress. Using this plug-in, you
can create new roles, delete or clone existing roles, manage user capabilities
and more. However, it doesn’t allow you to modify any capability for
administrator and delete default user roles.

I have tried to collect every informational data regarding the topic mentioned above. Hope this is very fruitful to WordPress lovers. Suggest anything if you have in your thoughts. Share and comment below.
How To Change WordPress Theme Name – Rename Theme Folder & Hide It
Do you know that people can easily find out what
wordpress theme you are using in your site?
Just right click your website and
view page source; you will see your theme name like this
(yoursitename.com/wp-content/themes/your theme name). Do you wish not to show
your theme details to public? Then simply change your wordpress theme name.
It’s true that most of the wordpress sites are not developed
from scratch. Every site will have a theme as a base and from that they use to
get the desired look and feel. How many times you have landed in a website and
desired to know the theme name due to its elegant look and feel. Most of the
designers and developers will hide or change their original theme name because
they don’t want anybody to know what theme and where the theme came from etc.
There are many possible occasions where you will need to
change your default wordpress theme name. For example we have seen most folks
install a new wordpress theme in their site and start customizing it by editing
all the original theme files and CSS. So when the original theme gets updated
they will simply lose all the changes and awesome modification that they made
in their site. To avoid such cases it is recommended that you create a child
theme and other way that you can prevent this is by completely changing the
theme name.
When you create a new unique design by using a theme and
when the look is outstanding we suggest you to change your theme name. That is
you take the whole design credit instead of giving it to the theme author. Also
this can greatly prevent others from cloning your website. Here we will show
you how to change wordpress theme name in simple easy steps.

How To Find WordPress Theme Name?
Before hiding our own WordPress theme let see how to find
WordPress theme of others website. There are simple steps to find others
WordPress theme easily just find the below methods to know.
Method-1
Step 1:- Go to find it here.
Step 2:- Enter the URL of the website which you would
like to know about its wp theme.
Step 3:- You can find the WordPress theme of that
website and plugin used in that website easily.
Method-2
Step 1:- Visit the website which you would like know its
theme.
Step 2:- Click F12 button to inspect element
or right click on that website and click inspect element.
Step 3:- Now click Search icon or (click F2)
in inspect area and find for “theme”.


Step 4:- You can see the theme name here like this wp-content/theme/themename.


How To Change Or Rename WordPress Theme Name?
Giving your theme a unique name or changing or renaming your
existing theme name is fairly simple. The process just involves two steps that
is changing your theme folder name and changing few lines in theme CSS.
Step 1: Locate The Theme & Rename It
Here we will walk-through using “twentythirteen” wordpress
theme.
First locate your theme folder using FTP or cPanel.
You can find your theme folder in your wordpress directory that is
public_html/wp-content/themes.
Now right click the theme name and copy it to the same
location by renaming it to your desired name (see the screenshot below).
If you haven’t yet installed your wordpress theme then just
unzip it, rename it from your pc itself.
Note:- Make sure that when renaming your theme use only
lower case letters and do not use special characters or spaces.
You have changed your wordpress theme name and next you have
to change few lines in your theme CSS file which wordpress use to recognize the
name and other details of your theme.
Step 2: Changing Theme Name In CSS
Just open your theme folder that you renamed just now and you will see a file named style.css.
Right click the CSS file, click on edit and at the very
first you will see several piece of lines like this.
/*
Theme Name: Twenty Thirteen
Theme URI: http://wordpress.org/themes/twentythirteen
Author: the WordPress team
Author URI: http://wordpress.org/
Description: The 2013 theme for WordPress takes us back to the blog, featuring a full range of post formats, each displayed beautifully in their own unique way. Design details abound, starting with a vibrant color scheme and matching header images, beautiful typography and icons, and a flexible layout that looks great on any device, big or small.
Version: 1.0
License: GNU General Public License v2 or later
License URI: http://www.gnu.org/licenses/gpl-2.0.html
*/
Just replace all the desired fields that you want to change in your
theme.
Like:
theme name
theme name
theme URI
author name
author URI
description and
theme version
Example:–
theme name:- Twenty Thirteen to your custom theme name that you want for your wordpress theme.
author:- the WordPress team to your custom author name.theme name:- Twenty Thirteen to your custom theme name that you want for your wordpress theme.
Other than renaming, if you wish to hide the entire theme
details then you can simple remove those comment lines from your CSS. When done
save it and activate your new theme, that’s it! You have completely changed
your wordpress theme name and now you are using your own customized wordpress
theme. When someone is looking for your theme details then they will just get
the information that you have entered in your CSS file.
How To Hide WordPress Theme Name?
Step 1:- open theme folder in your local computer.
Step 2:- Find the file name Style.css and open
and write your desired theme name.
Example: MyBloggingCell
Step 3:- Delete Theme URL, Author, Author URL,
Description, Version, License URI, Version and any other link or name related
to theme name in your Style.css file.
Step 4:- Also delete the screenshot image from the theme
folder.
Step 4:- Now change the theme folder name as MyBloggingCell and
save it.
Step 5:- Now compress your theme as .zip file and
upload it in your website.
Note:- Your Theme name must be same on theme folder name
and also in style.css theme name.
That’s it all done now you can check your WordPress theme
name using Inspect element bar and third party website as I given above methods.
I hope you might like this article, please share and comment below.
I hope you might like this article, please share and comment below.
A Complete Guide To Installing WordPress
In comparison to many other website platforms available
online, WordPress has one of the simplest installation procedures. All you have
to do is extract the contents of the zip file, configure your database
settings, upload the files, and then run the WordPress installer.
That process sounds simple to anyone who has developed
websites in the past, however it can be daunting and confusing to those who
have not. And since WordPress is the most popular content management system
online, it is inevitably the platform that millions of people will use for
their first website.
In this article, I would like to walk you through how you
can install WordPress. I will show you a quick and easy way of installing
WordPress through your hosting control panel, and show you how to do it
manually yourself by creating the database and uploading the core files.

Installing WordPress Through Your Website Hosting Panel
If you are looking for the most straight forward way to
install WordPress, installing it through your web hosting control panel is your
best option. All you have to do is run a basic installation script and enter
your username and password. The installation script will create the database
and take care of all the configuration settings that need to be defined.
I will be showing you how to install WordPress through cPanel as it is by far the
most common hosting control panel in commercial hosting.
 |
cPanel is the default hosting control panel for most web
hosting companies. Hosting companies frequently customize cPanel, so your
hosting company’s version of cPanel may look a little different to this.
|
Other web hosting control panels include Parallels
Plesk Panel, DirectAdmin,
and Webmin. These hosting
control panels also support one-click installation scripts.
Common software installation scripts include Fantastico, Softaculous,
and Installatron.
In my hosting control panel, the installation scripts were simply listed under Site
Software.
Check your hosting control panel for an installation script
icon. It only takes a minute for a hosting company to add one-click
installation software to your hosting control panel; however some hosting
companies do not have it activated by default. Therefore, you may need to
contact them and ask them to enable support for one-click installs.
 |
Check your hosting control panel for one-click installs. Be
sure to contact your host if you cannot find it.
|
The interface for your one-click installation software may
look different to the screenshots below; however the process is essentially the
same. The first thing you need to do is select WordPress. You will see many
other software listed on this page such as discussion forums, chat scripts,
and other blogging platforms.
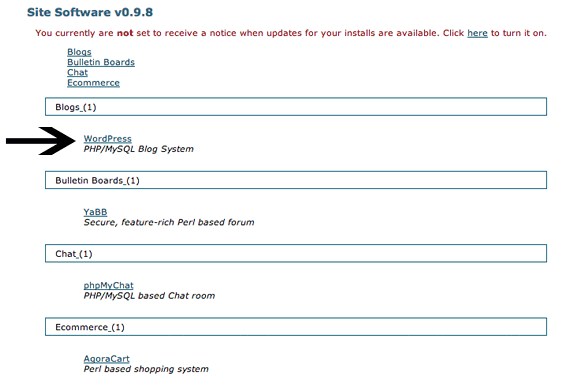 |
Choose WordPress from the list of software.
|
The next page asks you to enter information about your new
website. The first part relates to the primary administrator account that is
set up (i.e. your WordPress account). You need to choose a username and
password and enter your email address.
Remember not to use admin as your username. That
poses a major security risk as it makes it easier for hackers to guess your
login details.
The installation URL defines the location of your WordPress
website. As you can see from the screenshot below, if I leave the field blank,
WordPress will be installed at the root of the domain (which I assume is what
most people want). You can also install it in a sub-directory such as blog.
The script will create a brand new database for your
website. Alternatively, you can select an existing database from the drop down
list.
 |
The installation process will only take you a few minutes.
|
In the last part of the configuration page, you need to
enter your website name and description. The table prefix will default to wp_.
Table prefixes are useful if you want to use the database for more than one
website. From an administration point of view, it also helps distinguish
WordPress core tables. It is worth changing the table prefix to something more
obscure to make it tougher for hackers.
 |
Congratulations. You have just installed your WordPress
website!
|
That is all there is to it. You will now be able to view
your website at the location you defined as the installation URL. The admin
area can be found at /wp-admin/ (i.e. www.yoursitename.com/wp-admin/).
How To Install WordPress Manually
The process of installing WordPress manually for the first
time can be daunting to beginners. You need to create a database, configure the
wp-config.php file, upload files, and run the WordPress installer. If you do
any part of this wrong, the installation will fail. So it is no surprise that
many people ask their hosting companies to install WordPress for them.
As I will show you, the process of installing WordPress is
straight forward. You just need to take your time and ensure you do each step
correctly. If you do, you will find the process of installing WordPress
manually almost as easy as using installation software.
Step 1: Download WordPress
The first thing you need to do is Download Latest Version of WordPress from WordPress.org. |
Visit WordPress.org to get the latest version of WordPress.
|
WordPress will be downloaded in a compressed format (in .zip
or .tar.gz). You therefore need to extract the WordPress folder contained
within the compressed file to your computer.
 |
Extract the WordPress folder from the downloaded file.
|
Step 2: Create WordPress Database
WordPress stores all of your data in a MySQL database. This
includes your website settings, plugin settings, theme settings, users, posts,
pages, and more.
To create a new database, you need to click on the MySQL
Databases link within your hosting panel. If you are not using cPanel,
this may be called something else; however it will probably called something
obvious such as Database Management.
 |
Click on the link for MySQL Databases.
|
At the top of the MySQL Databases page you will
see an option to create a new database. You can call it anything you want.
cPanel assigns your hosting account username as a prefix, however your own
hosting panel may not do this.
 |
Enter a name for the database.
|
You will then receive confirmation that your database has
been created. Make a note of your database name at this point.
 |
Confirmation of your database being created.
|
Next, you need to create a user to access your database.
cPanel will also assign your hosting account username as a prefix to your
username.
 |
Create a new user for your database.
|
You can use any password you wish, however you will be
encouraged to use a strong password. I recommend using the password generator
that is available as it ensures that you use a password with a 100% strength
rating. If you click on the Use Passwordbutton, your generated password
will be automatically inserted into the password field.
 |
Take advantage of the password generator to ensure you use a
strong password.
|
Once you have completed all user fields, click on the Create
User button.
 |
All fields need to be completed before you can proceed.
|
You will then be given confirmation that the user has been
created. Be sure to take a note of the username and password as you will need
this information later.
 |
Take a note of your database username and password.
|
The user has to be given access to the database. If this is
the first user and database you have created, it will default to those in the
fields. If other users and databases exist, you need to be sure to choose the
correct user and database.
 |
Make sure you choose the correct user and database.
|
On the next page, you can manage the privileges for the
user. You need to ensure you give your user All Privileges as it
allows WordPress to modify the database, create new tables, execute, and more.
 |
Give your created user permission to control the database.
|
You will then receive confirmation that the user has been
added to the database.
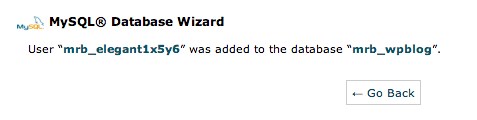 |
Confirmation that your user can now access your database.
|
Step 3-A: Create WP-Config.php Configuration File (Method 1) & Upload All WordPress Files
Make sure to search for some snippets for
wp-config.php that allow you to change the way WordPress works; such as
how many post revisions are saved and when items are deleted from trash.
Although the wp-config.php configuration can be used to
change the default settings of WordPress, its main purpose is to connect the
WordPress core files to the WordPress database. If the database connection
details within wp-config.php are incorrect, your website will display a
connection error.
There are two ways in which you can create the wp-config.php
configuration file. The first way is do it manually by renaming the
wp-config-sample.php file that is stored in the top level of WordPress to
wp-config.php.
 |
Rename wp-config-sample.php to wp-config.php
|
You then need to open up wp-config.php in an editor such as TextPad (Windows),TextWrangler (MAC),
or Bluefish (Linux/Unix).
You will see the MySQL connection settings area at the top
of the file. It looks like this.
// ** MySQL settings - You can get this info from your web host ** //

/** The name of the database for WordPress */
define('DB_NAME', 'database_name_here');

/** MySQL database username */
define('DB_USER', 'username_here');

/** MySQL database password */
define('DB_PASSWORD', 'password_here');
All you have to do is enter your database name, username,
and password. For example, using the information that I used in the screenshots
above, we would have.
// ** MySQL settings - You can get this info from your web host ** //

/** The name of the database for WordPress */
define('DB_NAME', 'mrb_wpblog');

/** MySQL database username */
define('DB_USER', 'mrb_elegant1x5y6');

/** MySQL database password */
define('DB_PASSWORD', '{IAFL]ye)+mr');
The table prefix for your WordPress database can also be
defined in wp-config.php. You can define the Authentication Salt too.
$table_prefix = 'wp_';
Once you have entered your database connection details and
table prefix, save the wp-config.php.
You now have to upload all WordPress files to your website.
To do this, you need to use a File Transfer Protocol (FTP) client. I personally
use FileZilla,
however there are hundreds of free and premium alternatives available online.
To connect to your website via FTP, you need to know your
FTP connection details. An FTP client will request your hostname, username, and
password.
Hostname is normally your website address, however it may
also be your server’s IP address. With cPanel users, the FTP username and
password is usually the same as your cPanel login information; but this is not
always the case.
To be sure, refer to the welcome email that your hosting
company sent you when you signed up. That will detail your FTP hostname,
username, and password.
 |
Connect to your website via a File Transfer Protocol client.
|
Once you are connected to your website, you can upload all
the contents of the WordPress folder that you extracted from the downloaded
file earlier. Before uploading, double check that you are uploading to the
correct folder. In cPanel, you need to upload files to the public_html folder.
Therefore, to install WordPress in a directory entitled blog, you would upload
files to /public_html/blog/.
Other hosting control panels are set up differently. You may
have to upload files to a folder entitled www. Again, if you are unsure about
any of this, refer back to the welcome email that your hosting company sent you
after signing up. If you are still unsure, contact your host and ask them to
confirm the exact directory you should be uploading files to.
 |
Be sure to check that you are uploading WordPress files to
the correct location.
|
Note:- Complete either Step 3-A or Step 3-B; but not both.
These steps will both create a functioning wp-config.php configuration file,
however the creation process is slightly different.
When you visit your installation URL, WordPress will advise
you that the wp-config.php has not yet been created.
Step 3-B: Create WP-Config.php Configuration File (Method 2) & Upload All WordPress Files
WordPress can create the wp-config.php file on your behalf.
To do this, upload all files to your installation URL. This includes the
unaltered wp-config-sample.php file.
 |
WordPress can create the wp-config.php file on your behalf.
|
The next page details the information you will need in order
to create the wp-config.php file.
 |
WordPress reminds you what information you need to create
the wp-config.php file.
|
On the next page, enter your database name, username, and
password. The database host field will be localhost most of the time
(i.e. 99.99%). I cannot recall the last time a hosting company asked me to
enter an IP address in this field, though it is possible that a hosting company
could ask you to use an IP address instead of localhost.
Finally, there is the option to define the table prefix that
your WordPress database will use.
 |
Enter the database connection details that you noted earlier.
|
On the last page, WordPress confirms that the wp-config.php
file has been created correctly.
 |
Congratulations. You have just created the wp-config.php
file!
|
Step 4: Run The Famous Five Minute WordPress Installation
After you have created the wp-config.php file and uploaded
all files, you need to run the WordPress installer. You will find this at the
URL you uploaded your files (WordPress will redirect you to
www.yourwebsite.com/wp-admin/install.php).
This part is known as the famous five minute WordPress
installation process; however the truth is that this part will take you less
than a minute.
All you have to do is enter your website name, your desired
username and password (i.e. to login to WordPress), and your email address. The
form defaults to allowing search engines to index your content, but you can
disable this if you will not be launching your website for a while.
 |
Enter your website name and your user account details.
|
The following page confirms that WordPress has been
installed correctly. You will then see an option to log in.
 |
You will receive confirmation that WordPress has been
installed.
|
Clicking on the Log In button will take you to the
WordPress login page. Simply enter the username and password information that
you just set up and you will be taken to the WordPress admin area.
 |
Famous Five Minute Install 3
|
Congratulations:– You have just installed WordPress.
I hope you have found this article on installing WordPress
useful. Be sure to subscribe to our blog for future articles as we have some
great content in the pipeline. Also make sure to share it to your friends and if you have any suggestions regarding this article please comment below in comment section.
To Recap, Io Install WordPress Manually You Need To
2. Create the WordPress Database
3. Create the WP-Config.php Configuration File and Upload All
WordPress Files
4. Run the Famous Five Minute WordPress Installation
You may not realize you have made any mistakes until you try
to run the WordPress installation script. The most common reason for there
being a connection error at this stage is the database information in your
wp-config.php file being incorrect. As little as one incorrect character will
stop WordPress from connecting to the database you set up.
If you do receive a connection error at this stage, retrace
the steps detailed in this guide. Check that the database has been set up
correctly and that the user has been assigned with access privileges for that
database. Then double check that the connection details match those in the
wp-config.php file.